How to Do Image Recognition Using Deep Learning in Java

QUICK SUMMARY: This tutorial provides a step-by-step guide on creating a simple deep learning model for imaging in Java, using a convolutional neural network. The resulting deep learning model has the capability to provide a YES/NO response regarding whether the image contains a specific object or visual pattern of interest.
To create a deep learning model for image recognition, first you need to provide example images to the model in order to find patterns in image pixels. This is called training or building of the model. You can train the model using Deep Netts library or Visual AI Builder tool. Once the model is trained you can easily deploy it into your Java application using Deep Netts library.
Everything you need to run examples from this tutorial is available in the Required resources section at the end.

Getting examples of java images for training sets
In this tutorial, we’ll use a set example images of Java community mascot Duke (aka training set). The trained model will be able to assign a given input image into one of two possible categories: Duke or Not-Duke.
Download the example images here and unpack the downloaded zip file.
Note that the prepared data set contains both positive examples (images that contain Duke), and negative examples (images that don’t contain Duke). You can also use other, custom images and categories.
Building a deep learning model in Java code
Here are code segments for
- creating training set from example images
- creating the model – a convolutional neural network
- training the model and
- testing the model.
Full source code is available on the GitHub
Creating training set from example images
Loading and preparation of images for is performed by ImageSet class.
ImageSet imageSet = new ImageSet(imageWidth, imageHeight);
        imageSet.setResizeStrategy(ImageResize.STRATCH);
        imageSet.setInvertImages(true);
        imageSet.loadLabels(new File(labelsFile));
        imageSet.loadImages(new File(trainingFile));
        imageSet.zeroMean();
Creating the model – a convolutional neural network
A builder for convolutional neural network allows you to specify various configuration settings in an intuitive way.
        ConvolutionalNetwork convNet = ConvolutionalNetwork.builder()
                .addInputLayer(imageWidth, imageHeight, 3)
                .addConvolutionalLayer(6, Filters.ofSize(3))
                .addMaxPoolingLayer(Filters.ofSize(2).stride(2))
                .addFullyConnectedLayer(16)
                .addOutputLayer(1, ActivationType.SIGMOID)
                .lossFunction(LossType.CROSS_ENTROPY)
                .hiddenActivationFunction(ActivationType.LEAKY_RELU)
                .build();
How to train image recognition model
After getting an instance of a trainer from the network and setting basic training configuration parameters, the only thing to do is to invoke the train method using the previously created training set.
// Get a trainer of the created convolutional network
BackpropagationTrainer trainer = convNet.getTrainer();
trainer.setStopError(0.03f)         // stop when training error is below this value
       .setLearningRate(0.01f);     // controls the learning step size

// run training network using loaded training set
trainer.train(trainTest.getTrainSet());
Testing the trained model
Testing the network includes calculation of various metrics using test set, and is also performed using a single test method call on instance of the trained model.
EvaluationMetrics testResults = convNet.test(trainTest.getTestSet());
System.out.println(testResults);
Building a Java Deep Learning Model Using Visual AI Builder Tool
Create a new project
- Create a new Deep Netts project by clicking [File > New Project] in the main menu, enter the project name and click [Next]
- Choose [Classify Images] option and click [Next]
- Choose [Binary Classification] option (since there are only two categories of images: duke or non-duke image). Click [Next]
Choose example images and preprocessing settings
- Specify image directory to unpacked downloaded image set. Wizard will automatically detect or generate category labels image index. Click Next.
- Set image data preprocessing option: resize and center, uncheck invert pixels and upsample to balance classes. These settings are not critical for this small data set, so other settings would work as well. Click [Next]
Model and training configuration
- Specify small convolutional neural network architecture (add 1 convolutional layer with 3 channels that perform image filtering and feature detection, one max-pooling layer that scales down an image, and one fully connected layer that helps with classification with width 16). Other settings are preselected by the expert wizard for this type of task. Click [Next]
- Set main training parameters that include network architecture and training/test set split options (or accept settings provided by the expert wizard). Click Next.
- Set additional training algorithm parameters (or accept settings provided by the expert wizard ). Click Next.
Run training and test trained model
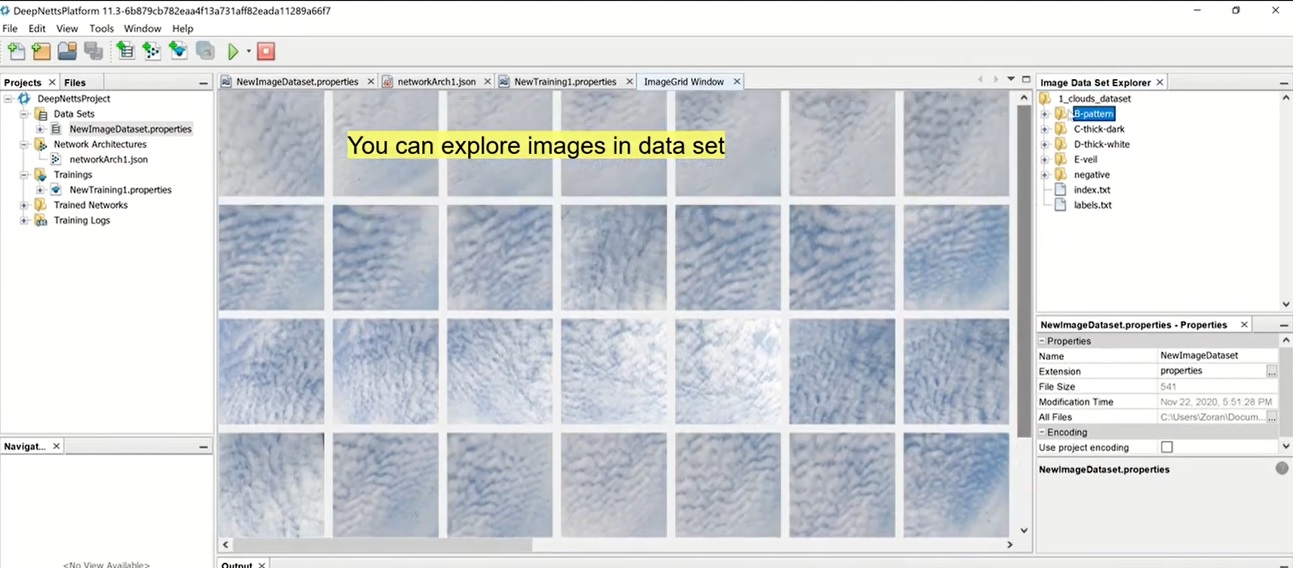
- Run Training by right-clicking training file and then select [Run Training File] menu option. In training dialog check [Visualize Layers] option to be able to observe layer activity during the training. You can also observe network outputs, error and accuracy graphs and inspect detailed logs for each training iteration (aka epoch). You can analyze the training process and test metrics in log (confusion matrix, accuracy, precision, recall). An entire log file will be available for later inspection and comparison in [Training Logs] project folder.
- The trained convolutional network is available as a serialized object in [Trained Networks] project folder
- To test the classification of the trained model with the entire data set use [Tools > Test Image Set] in the main menu
How to do image recognition using the trained deep learning model in Java
To use the trained convolutional network in your Java app, use the following Java code:
// Load trained convolutional network
ConvolutionalNetwork trainedNet=  FileIO.createFromFile("trainedNetwork.dnet", ConvolutionalNetwork.class);
// turn on image preprocessing used during the training
((ImagePreprocessing)trainedNet.getPreprocessing()).setEnabled(true);
// Create image classifier based on trained network and VisRec API
ImageClassifier imageClassifier = new ImageClassifierNetwork(convNet);
// load image to classify
BufferedImage image = ImageIO.read(new File("someImage.jpg"));
// Classify new image and get probabilities for all possible classes
Map<String, Float> results = imageClassifier.classify(image); // result is a map with image labels as keys and corresponding probability
// utility class to simplify access and interpretation of classification results
LabelProbabilities labelProb = new LabelProbabilities(results);
Required Resources
In order to run examples from this tutorial you need the following:
- Deep Netts Java library & Visual AI Builder tool download
- Step-by-step installation tutorial is available in Quick Start tutorial
- Prepared data set with example images of Duke
- Full source code available on GitHub: https://github.com/deepnetts/DukeImageRecognition